How to Upload Images
| How to Upload Images | |
|---|---|
| Type | Wiki Guide |
This guide will show you the basics of uploading images to the wiki. Try to upload images to the correct namespace, because if they go into the wrong namespace they can only be moved/deleted by an administrator (Zichqec/ulde3). But if you mess it up, don't worry about it, please just contact someone to have it fixed. Refer to the style guide for what namespaces to use for images.
This guide will go over how to use the full screen media manager specifically, which can be accessed by clicking “Media Manager” in the sidebar, under the Tools section.
Naming images
The names of images are important and should be considered carefully, especially in the gallery where they are the only way to indicate what an image is for. Consider using short, descriptive names like “main_menu.png”, “dialogue.png”, “idle_animation.gif”, etc.
Certain images on the wiki get specific naming schemes. A ghost's thumbnail image should always be called “thumbnail”, and an appearance image (used if the thumbnail doesn't show the whole ghost or looks different from the ghost) should always be called “appearance”. A balloon's balloon test image should always be “balloontest”. This makes it easier to quickly use images on the wiki.
Uploading to an existing namespace
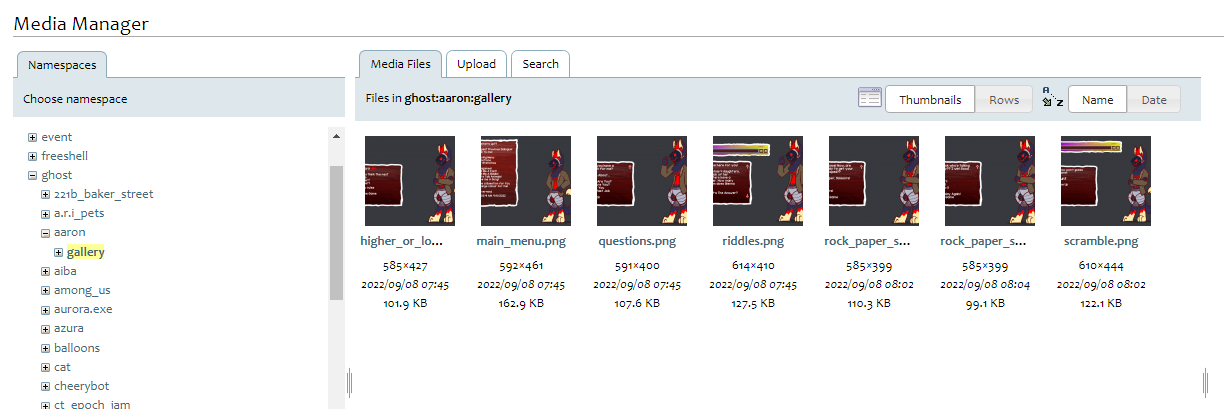
If the page you want to add an image to already exists and has images, you can simply use the left panel of the Media Manager to navigate to the correct namespace. The plus icons to the left of each folder will allow you to expand them, and you can scroll until you find the correct name. Clicking on a folder/namespace will show you the images in it. Clicking on the Upload tab will allow you to upload images to the currently selected namespace.
As you can see in the image, it says “Files in ghost:aaron:gallery
This indicates which namespace is currently selected. Double check this before you upload images and make sure it is pointing to the correct place!
Images to go in the body of a page (like the thumbnail image, or a balloon that is bundled with a ghost and not available separately) go in that ghost's namespace, while any other images for the gallery go in a gallery sub-namespace under the ghost.
Creating a new namespace
When creating pages for new contributions, they will not have namespaces made for them yet. In this case, select the closest possible namespace. For example, if the new page is a ghost, select the ghost namespace. Then, when you upload your images, prepend the name of the namespace you want to create to the filename, separated by a colon. So for example, if the ghost “Wiki Example” does not yet have a page and I want to upload thumbnail.png for that ghost, I would go to the ghost namespace, and upload the file with the name “wiki_example:thumbnail.png”. This will create a new namespace called wiki_example, and put thumbnail.png in it.
You can do this for multiple namespaces at once. For example, I could also go to the ghost namespace and upload an image such as “wiki_example:gallery:main_menu.png”, and this would create both of the namespaces if neither one exists. Note that the list of namespaces in the media manager won't update until you refresh the page.
Making an image show on the page
This is covered on the syntax page, but a simple explanation is that curly braces are used to write image paths. For example, {{ghost:aaron:thumbnail.png}} will make this image display:
We try to avoid having images display wider than 300px on the wiki. Any image that is larger than 300px should be scaled down with DokuWiki's inbuilt scaling, except on dev pages and guides. Images should never be scaled up, only down. To make an image be scaled to 300px wide, add ?300 after the file extension. So {{ghost:aaron:thumbnail.png?300}} will display as such:
This keeps things from getting excessively large, and keeps the wiki consistent.
You won't have to worry about any of this for galleries. For gallery sections, the gallery tag will automatically get all of the images in the specified namespace, and resize and display them according to our configuration. However, if you upload images to a gallery, you will have to edit and save the page in order for the new images to display. If you're making a new page, it may be worth uploading the images before publishing the page for the first time.
Updating an old image
If you need to update an old image, you can do so by finding that image in the media manager, and uploading a new image with the same name to the same namespace. You will need to tick the box that says “Overwrite existing files”, or else it will not upload the new image.


